Converting Bone-Skinned Models to Non-Human Characters
3DXchange helps you convert almost all bone-skinned models,
with or without embedded animations, into an avatar for use with the
IK and FK features in iClone.
The exported avatar is called Non-human Character since the
bone structure and the mesh nodes totally differ from the Standard
Characters in iClone.
The characters created in this section can only be animated by the commands in the right-click menu,
or by using key-framing techniques (with Motion Editor). However, if you want the converted characters to be able to
utilize the MixMoves, Motion Puppet, Direct Puppet, Device Mocap features or be applied
with the templates in the Motion Library from the Content Manager, then you need to follow the
Converting Models to Non-Standard Human Characters pipeline.
The supported file formats for this pipeline are:
|
Supported File Format
|
.vns
.iProp
.FBX
|
Generating Non-human Character from iClone iProp or FBX File
Video Tutorial: Maya
Video Tutorial: DAZ
Video Tutorial: Blender
The models from iClone are embedded with AML animation clips. Though these clips cannot be loaded into 3DXchange, they can be extracted and
converted into motion clip files after the iProp is converted into an Non-human Character.
-
Drag and drop any bone-skinned model into 3DXchange. You may encounter the
Sampling dialog box if you load an FBX file. Please refer to
Loading and Sampling for more information.
-
Refer to Generating motion clips if the FBX file is embedded with animations.
(Skip this step if the loaded model is bone-skinned content from
iClone)
-
Click the Convert to Non-Human button in the Character section.

-
A command dialog box for setting bones pops up. Click the OK button
and the iProp will now become a character.
(Please refer to
Setting Bones for Converting to Non-Human Character section for
more information about the dialog box)
-
Optionally,
You may modify the mesh of the newly-generated character. Please refer to
Modifying Mesh for more information.
-
Export (Ctrl + E) the model as an avatar (.iAvatar).
-
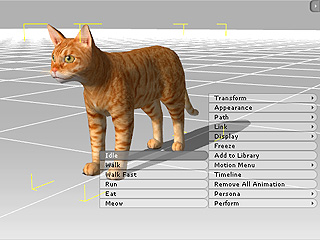
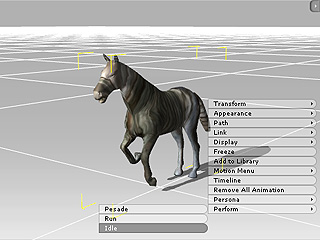
Load the character into iClone. Right click on the new-generated avatar and
all the animation clips you added will be listed in the Perform
entry of the right-click menu.
|
|
|
Perform list in iClone
|
Note:
-
If the loaded model is a bone-skinned iProp from iClone, you can
not play to view the embedded animations. However, these
animations will be extracted from the model once it is converted
into a character.
-
The extracted motion clips are stored, by default, in C:\Documents and Settings\All Users\Documents\Reallusion\Custom\iClone 5 Custom\Motion\.
-
If you encounter an issue where the character hops as you are using the IK and FK methods in iClone,
then please
delete the first clip and key in the Perform and Motion Layer tracks.
-
You may also modify the material of a selected mesh node before converting
the model into an avatar. Please refer to
Material Section
for more information.