Converting Models to Non-Standard Human Characters (New for 5.4)
3DXchange assists you in converting Characters, created in
different 3D software, and bringing them into iClone as .iAvatar characters. Once converted and imported into iClone, users may then
utilize iClone's body and facial animating tools (including Facial Puppeteering, MixMoves, Motion Puppet, Direct Puppet,
and Device Mocap) to have characters perform different
facial expressions and motions.
For this pipeline, you need to have a bone-skin rigged model in one of the supported file formats listed below:
|
Supported File Format
|
.vns (human-shaped or four-limbs prop)
.iProp (human-shaped or four-limbs prop)
.FBX
.iAvatar (Non-human character only)
|
Characteristics of Non-Standard Human Characters
Because a normal, custom character consists of a one-piece mesh; after conversion, you will be able to apply iClone human motions (*.iMotion) and facial animations to it.
However, it will lack the ability to swap out body parts such as upper and lower body.
Before converting a custom model into a non-standard human character for use in iClone, you
first need to be familiar with its characteristics:
-
A non-standard human character has the same basic skeleton structure as a standard iClone character.
-
The fingers, toes and facial bones can be absent for a non-standard human character.
-
The number of spine bones for a non-standard human character can be from 1 to 9.
-
The number of the neck bones for a non-standard human character can be from 0 to 10.
-
The collar bones for a non-standard human character can be present or absent.
-
You can puppet the body and the facial features of a non-standard human character.
-
The bone proportions for a non-standard human character are adjustable in iClone; however,
you must use the drop-down list to select the bones instead of picking the body parts for
adjustments.
*Please note that this pipeline mainly works for converting Human-shaped Characters or Four-limbs Characters.
Step 1: Preparing a Custom Character and Entering Characterization Mode
-
Load a biped model file in one of the formats described above. The files must follow the
conventions described in the sections below:

-
Adjust the X, Y, Z values in the Transform section so that the
character will be relocated to the center of the world plane. Please note that you MUST NOT use the Align to Ground,
Align to Center or Reset Transform buttons to change the position of a character. You should only use these features when working with 3D props, not with characters.

-
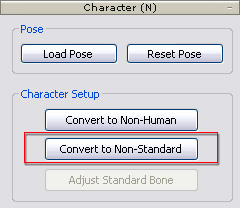
Go to the Character section of the Modify panel.
Click the Convert to Non-Standard button to enter the
Characterization mode.

The Modify page will instantly enter the characterization mode.

Step 2: Setting T-Pose
Because all iClone motions (*.iMotion) are based on a T-Pose, then you must
adjust the character's pose to a T-Pose so that you will not encounter any offset issues with the body parts once you apply iClone motions.
Custom Character with Known 3D Tool Source
-
If you know the 3D tool source that was used to create your custom character, then you
only need to select a prepared profile with a completed T-pose for the character.
Please refer to the
Auto Setting T-Pose section for more information.

Custom Character with Unknown 3D Tool Source
-
If the character is not presently positioned in a T Pose, then you need to adjust the angle of
each bone by using the controls in the Bone Property section. For more information about
setting the T-pose, please refer to the
Manually Setting T-Pose section.
Step 3: Mapping Custom Character Bones to Reallusion Human Bones
Converting a custom character to a non-standard human character in 3DXchange actually
maps the custom bones to the standard iClone bones so that when the iClone motions are applied to your custom character, then the character will be triggered according to the standard bones which
the motion was originally built for.
Custom Character with Known 3D Tool Source
Custom Character with Unknown 3D Tool Source
Step 4: Fine-Tuning and Detailing Non-Standard Human Character Settings and Exporting
-
After finishing with the mapping, enable the Active checkbox so that the custom bone structure can be governed by the RL Bone.

-
In the Property tab, adjust the weight center of the character by setting the
Hip Offset; also adjust the legs by setting the in-between Spacing
and Height. Please refer to the
Fine-Tuning the Pose of the Converted Character section for more information.
|
Side View
|
Front View
|

|

|

|
|
Offset the hip to straighten up the body.
|
Raise the feet of the character.
|
Spread the feet wider to straighten up the legs.
|
-
Optionally
modify the
sizes and positions of the contact planes for the Floor Contact feature (in iClone) for the hands and feet in the
Floor Contact tab.

|

|
|
The floor-contact planes for the hand.
|
The floor-contact planes for the foot.
|
-
Optionally map the facial and extended bones (if any) so that the converted character
can have facial expressions by using any facial-related features in iClone.

|
|
The facial bones are mapped and ready to be
animated for creating expressions.
|
-
Click the Convert button to exit the Convert to Non-Standard mode.
-
Export the mapped character to use it inside iClone as a Non-standard Human Character.


