
Some features are for CrazyTalk 5 PRO Edition only. For more information, please see Version Information.
The Script page is the critical phase in CrazyTalk's process of creating a talking message. Here you decide what and how your model talks and specify the expressions, facial movements, and special effects that go along with the animated script.
Note: You can download the text-to-speech converter from Microsoft, or browse to Reallusion's website for more information.
To create a Talking Message:

Click New
![]() button to start a new script without any keys.
button to start a new script without any keys.
To specify the speech for the talking model, do one of the following:
To record sound, click the Sound
Recorder
 button.
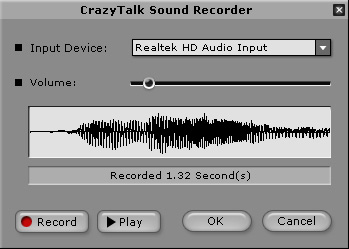
Click the Record button to start recording. Recording from the specified audio source starts.
To import WAV/MP3 files, click the Import
Audio File
 button to import a speech file in PCM
WAV/MP3 format. Specify the name and location of the WAV/MP3 file using the dialog
box and click Open to open the file.
button to import a speech file in PCM
WAV/MP3 format. Specify the name and location of the WAV/MP3 file using the dialog
box and click Open to open the file.
To convert text to speech, do the following:
Click the Text-To-Speech
![]() button.
button.
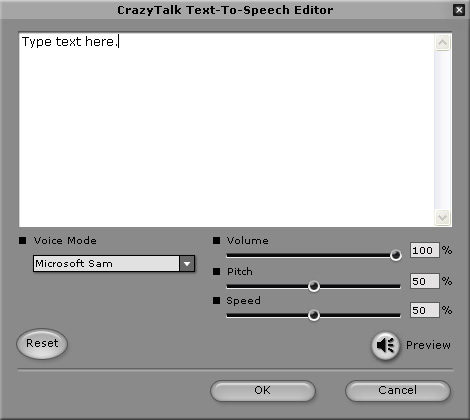
Type the text in the editor window.
Select the type of voice to be used by the model for speaking, using the Voice Mode drop-down box.
Adjust the voice quality to achieve a real-life effect using the Volume, Pitch, and Speed sliders. Click the Preview button to play back the text. Click OK when done.
To insert background music, click the Background
Audio
 button.
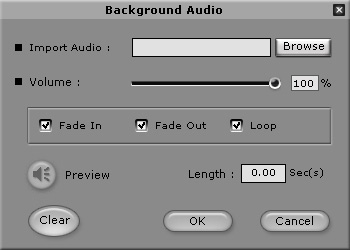
Click the Browse button to import a song or musical track in PCM WAV/MP3 format.
Move the Volume slider to adjust the volume.
Check the Fade In or Fade Out options to specify if you want the background audio to fade in or out respectively. Check the Loop box to repeat the background music continuously.
Click Preview to play back the background audio.
To select an expression profile, click the Emotives tab to view a set of basic profiles such as sad, angry, happy, and so on. Select the desired profile from the library and double-click it to apply.
You can adjust the strength of the expression
on the model's face using the
![]() slider.
slider.
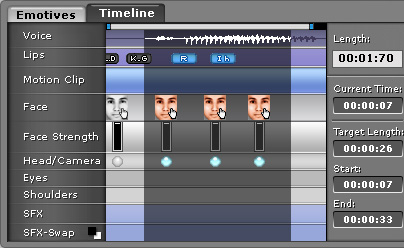
Click the Timeline tab to edit the animation script.
CrazyTalk provides basic editing tools to
cut, copy, paste, or delete portions of the track. Use
Cut
![]() ,Copy
,Copy
![]() ,
Paste
,
Paste
![]() ,
Delete
,
Delete
![]() to edit the track.
to edit the track.
You can view the complete script or enlarge portions of the sequence using the track viewing tools.
![]() : Zoom in.
: Zoom in.
![]() : Zoom out.
: Zoom out.
![]() : Zoom to selection - Drag to select a portion of the Timeline to
enable this button.
: Zoom to selection - Drag to select a portion of the Timeline to
enable this button.
![]() : Zoom Out Full - Zoom
out and view the complete script in the sequence window.
: Zoom Out Full - Zoom
out and view the complete script in the sequence window.

Edit keys in the tracks:
Double click on each track to invoke the related dialog box for further editing.
|
Track |
Double Click |
Description |
|
Voice |
Select all tracks. |
|
|
Lips |
Invoke Lip Synching dialog box. |
|
|
Face/Face Strength |
Invoke Facial Expression dialog box. |
|
|
Head/Camera |
Invoke Key Editor dialog box. |
|
|
Eyes |
||
|
Shoulders |
||
|
SFX/SFX-Swap |
Invoke the Special Effect dialog box. 
|
|
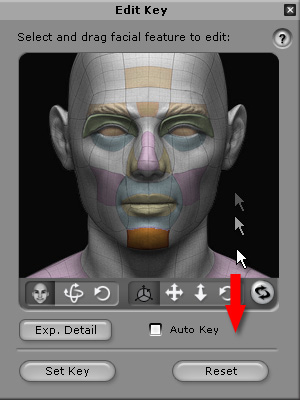
Pick Head/Camera, Eyes or Shoulders in the Key Editor dialog box, drag on the sample image to adjust the model, and click Set Key to add a key into the timeline. Check the Auto Key box to update the key automatically instead of pressing Set Key manually.

Click Puppeteering button to invoke the Puppeteering Panel
to create custom motion clips.
A motion clip will be overlapped as the top layer of the
Face, Head/Camera, Eyes or Shoulders tracks.
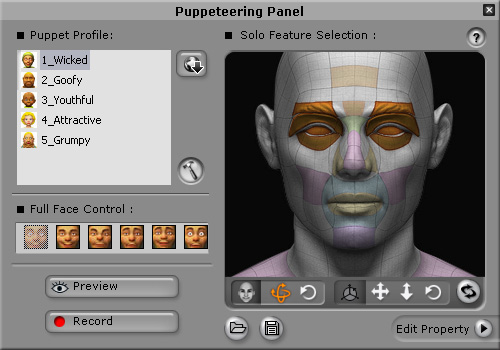
To create a motion clip:
Drag to select the desired portion in the Motion Clip track and
click Group
![]() button.
button.
Select a Puppet Profile and full face control, click Preview button and press Space bar to view the result. Click Record when you are satisfied with the settings.
Pick one desired profile and click Record button, press Space key to start recording the motion clip. Move your mouse so the model will be driven to move, and the movements will be recorded simultaneously. Press Space key again to stop recording.
|
Note:
|