3D SCAN PIPELINE
LEARNING VIDEOS

Get Ready to Make the Static Models Move

  • 2 Industry Experts
  • 19 Courses in 4 Hours
  • 401 Morphs for
    3D Scan Optimization
$ 49.00VALUE
  • 19 Courses in 4 Hours
  • 401 Morphs for 3D Scan Optimization
$ 49.00 VALUE

After the setup of your realistic 3D scan model, it’s time to turn it into a fully animatable CC (Character Creator) character! Reallusion is introducing the most important tools and detailed knowledge required to make it happen. Follow the step-by-step guide designed by the industry-leading experts and get access to more than 400 3D Scan Optimization Morphs which will help you fine-tune your characters for the best animation result.

Tools used in the tutorial videos:
Character Creator, iClone, ZBrush, Marmoset Toolbag, Wrap3, 3ds Max, Photoshop

Retopologize 3D Scanned Models to Character Creator (CC)

2.5 Hours - 13 Courses

3d scan pipeline tutor - Eddie Christian

Tutor: Eddie Christian

- Character Designer, Concept Artist, Matte Painter, Digital Sculptor

The Founder and owner of Solo Projects Studios. His studio provides custom code and art content for video game companies. In addition his studio produces a line of Sculpture, Art Prints and Custom Clothing which are sold online.

Introduction

0:57

In this Series of Videos we will look at a process to take data from a scanned human being and how to bring it into Character Creator 3. We will use Wrap3 and ZBrush to aid us in this process.

GoZ Intro

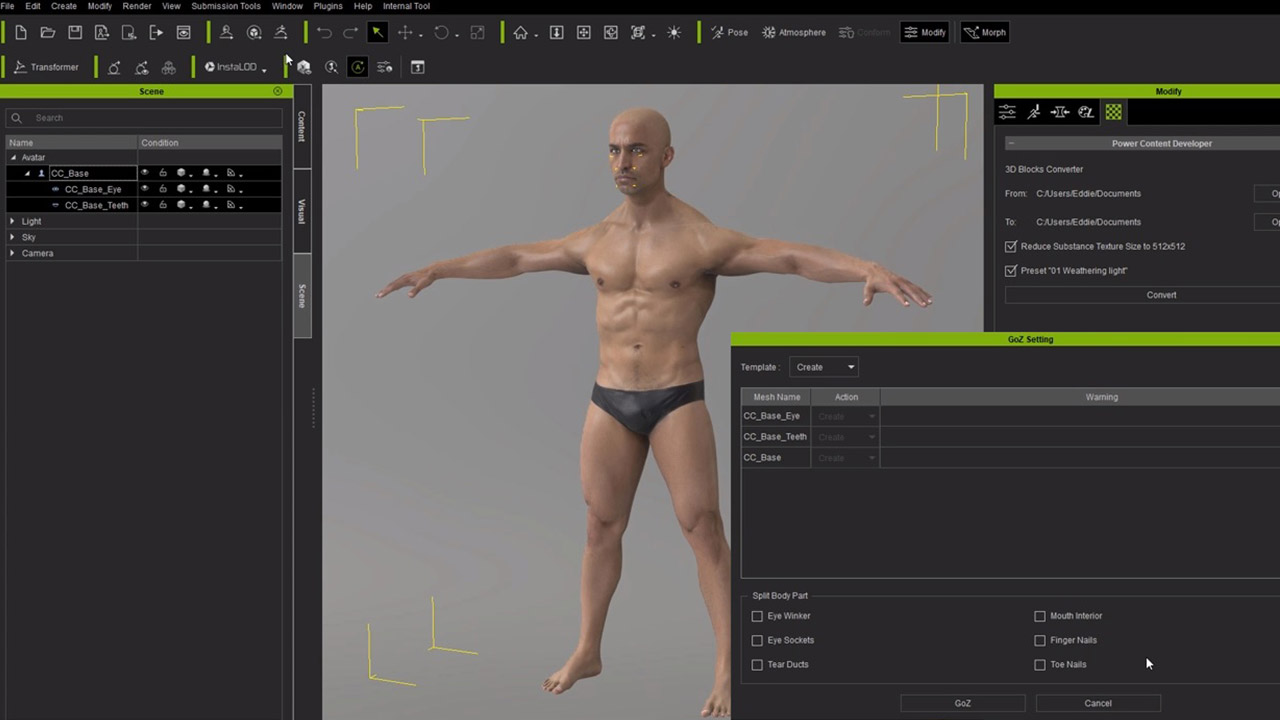
2:50

CC3’s new round trip ZBrush editing via GoZ and some of it’s options we will be using.

Proper Scans

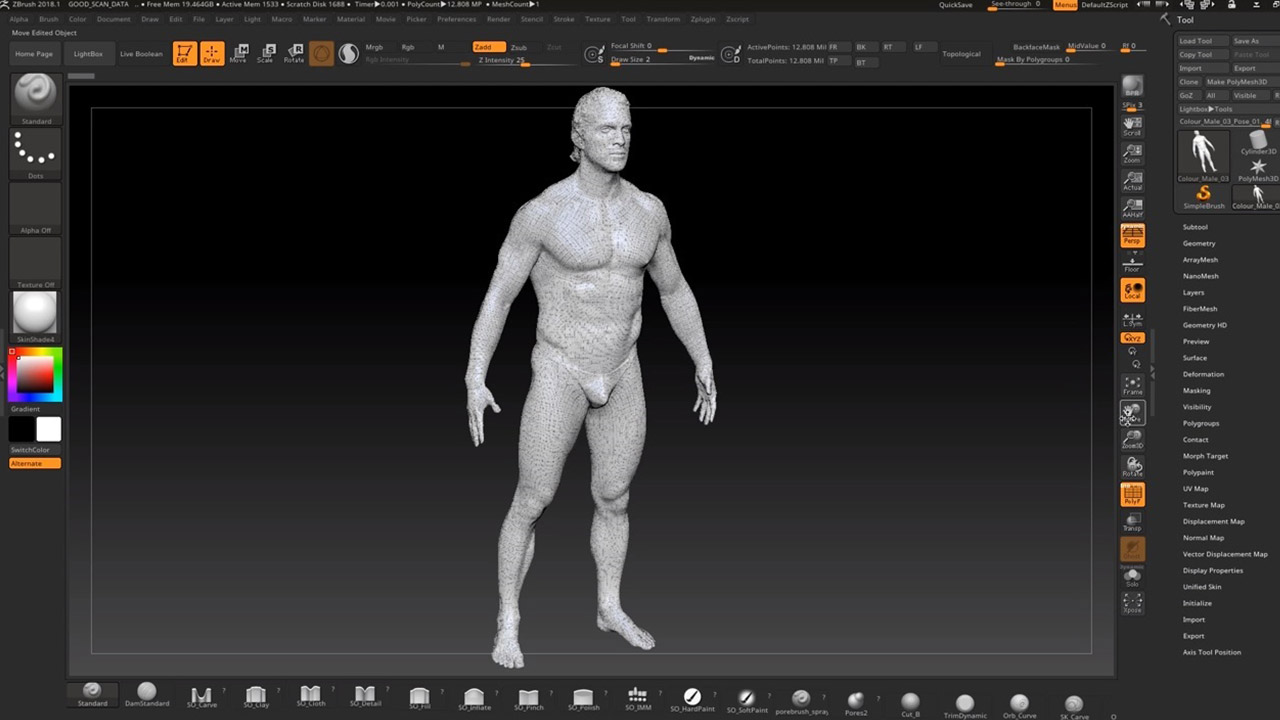
4:30

Chances are that you will be purchasing your scanned data of humans. Here we discuss what information a proper scan should and shouldn’t have in it. Afterwards you will know what to look for when you are buying scans.

UVs Vertex Colors

4:09

There are two main methods for storing color information in 3D meshes. One method uses texture maps and UV’s to guide their placement. The other method is to store color information in the vertices of the mesh itself. We will have an overview of both methods and their strengths and weaknesses.

Correct Pose

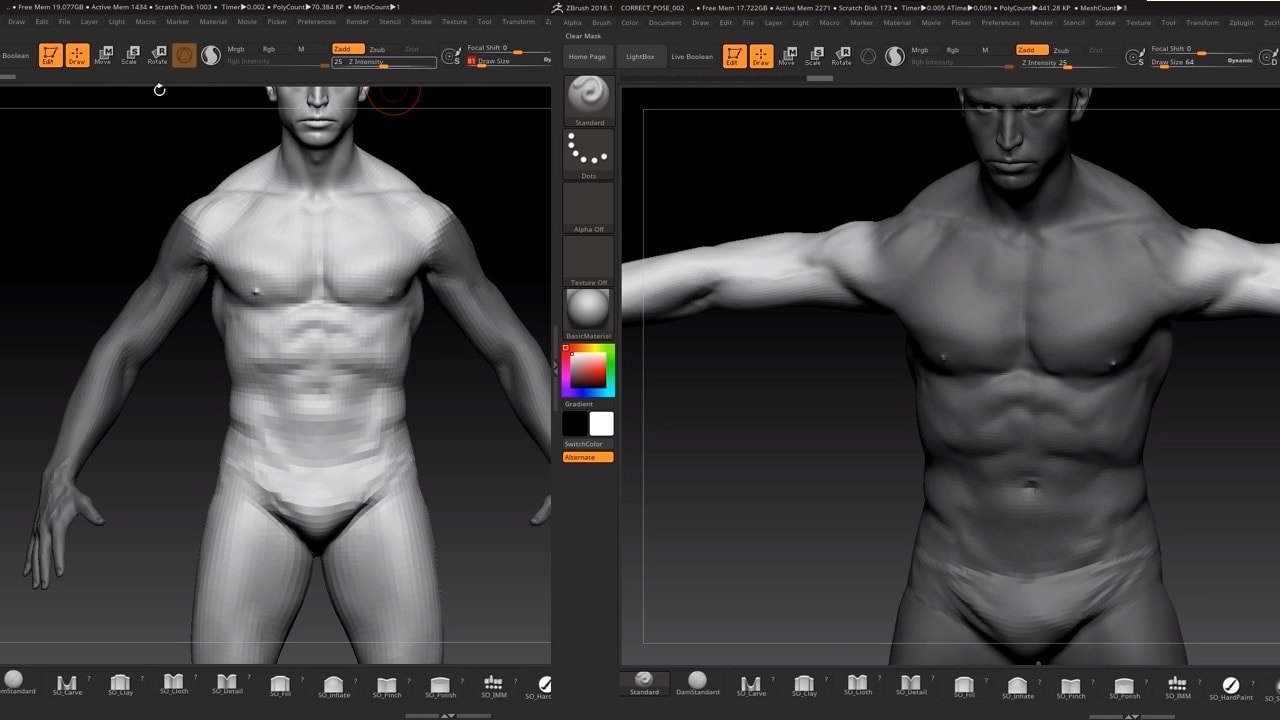
10:13

Often scans of people are done in what is called an “A” pose. This aids in the capture of the details we need. But most Rigging Tools require this pose to be changed to a “T” pose in order to add the skeleton we need to animate our character. We will use ZBrush to change the pose to the proper stance.

Wrap - Part 1

19:27

Wrap3 is used to project the details of our scanned human onto the base mesh we use in CC3. We start with an overview of how to use this amazing and very useful software.

Wrap - Part 2

16:22

Continuing from part one of the video, we look at some tips and tricks to make using Wrap3 as easy as possible with scanned data. Then we go through the process of exporting the data so we can use it in ZBrush and CC3.

Place Pieces

13:04

In this video we use ZBrush’s new Move Gizmo to place the Pieces of the Character. Small Pieces such as the eyes, are placed in the proper position to match our scanned character.

Project Details - Part 1

11:56

In preparation for transfering the details of the original scan to our mesh we bring both meshes into ZBrush. Then we make sure that both meshes are the same height and scale. This could also be done in any 3D modeling package other then ZBrush. The end goal is that both meshes are the same size.

Project Details - Part 2

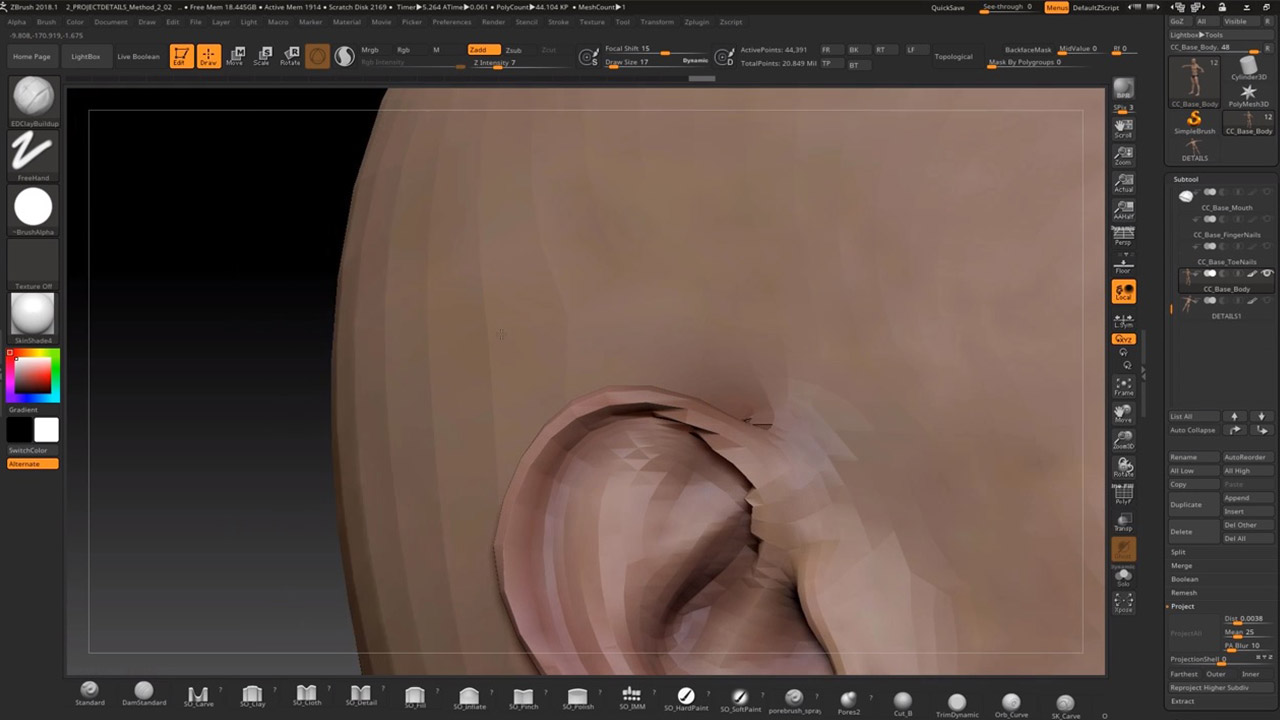
17:23

We go through the process of Pre-Subdividing our mesh in order to maintain quality as we project all the tiny details from the scan to our mesh.

Project Details - Part 3

18:19

We go over final clean up and look at our nails on the character. When we are satisfied with the character we send it over to CC3 using GoZ.

Generate Maps

15:59

Store the subtle detailes of the mesh as Normal Maps and Color Maps. Use Marmoset Toolbag to quickly create the Normal Maps, and ZBrush to create the Color Maps.

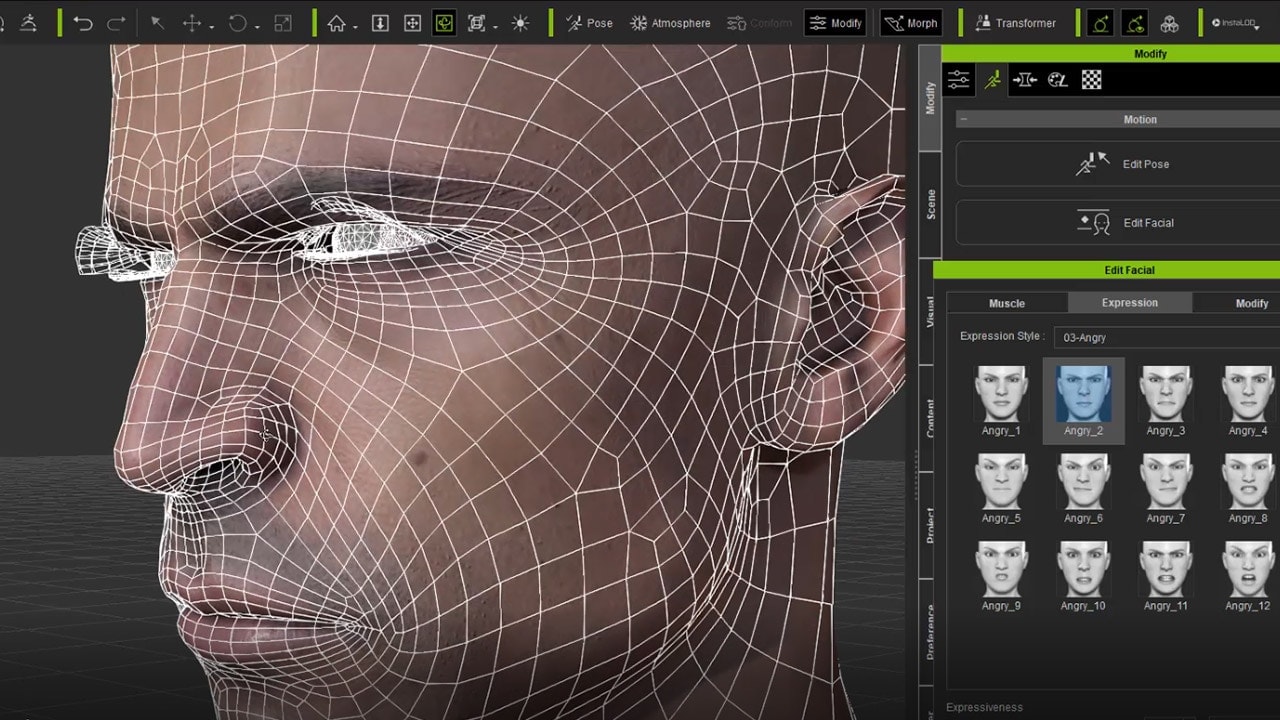
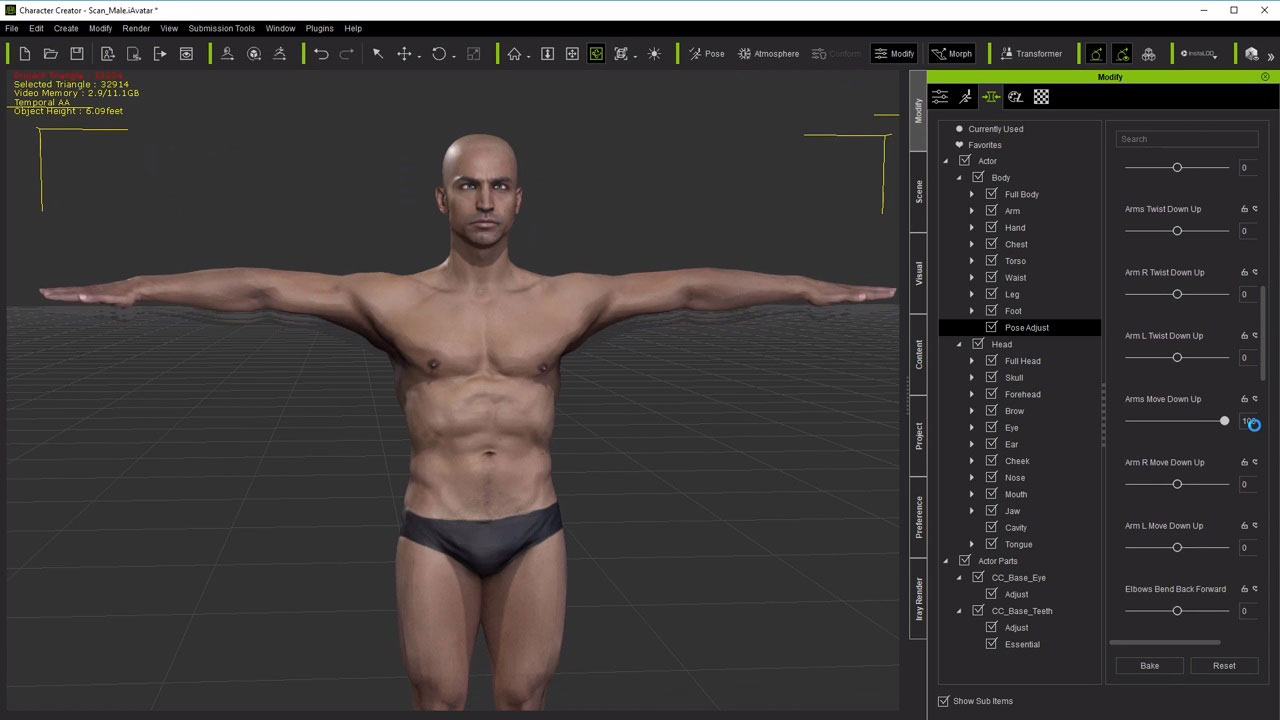
Final Tweaks & Auto Rig

19:25

Clean up some smaller details such as the inside of the mouth and the eyelashes to insures that are character is as realistic as possible. Send the final character to CC3 and Auto Rig him, which sets up the skeleton to move the character properly.

Optimize 3D Scanned Characters for Facial & Body Animation

1.5 Hours - 6 Courses

Tutor: Mike Sherwood (aka 3Dtest)

A 3D Artist and Consultant with over 20 years experience. Specializing in real time human modeling and animation systems, he has worked for games, tv and software companies - with a focus on low poly/ subdivision surface modelling, photo texturing, retopology and 3d character pipeline development.

character creator 3d scan pipeline - project setup

Project Setup & Critical Observation

3:52

Being critical of the model when static and when animated: what to look for when assessing a scan converted CC3 model before making further changes.

character creator 3d scan pipeline - pose and gase correction

Pose & Gaze Correction

5:24

The importance of CC3 correct default pose and gaze: demonstration of a simple pose and gaze correction method using an external application.

Fixing the Skull

10:10

Using Edit Mesh to improve the model’s shape: using the example of remodeling the skull, this approach is applicable to fine tuning any part of a character mesh directly within CC3.

Texture Correction

9:20

Diffuse and Normal maps may exhibit errors from texture baking and/ or incorrect alignment: using the head as an example, how to fix these errors using a combination of procedural mapping as well cloning in an external image editor.

Mouth Optimization

8:55

Improving animation by expression testing and editing whilst the model is in animated poses: this tutorial focuses on the mouth and also covers teeth and tongue alignment and texture adjustment.

Improving the Eyes

13:44

Eye shape, materials and animation quality all make a huge difference to whether a character appears realistic or not: demonstrating how to progress from unnatural looking eyes and distorted blinks through to a realistic and polished end result.

401 Morphs for 3D Scan Optimization

Additional specialized Adjustment and Balance Morphs to assist with head, face modeling and facial animation fine tuning, as well as pose correction for head, arms and hands directly with CC3.

228 Facial Adjustment and Balance Morphs

In Mouth Animation and Improving the Eyes tutorials, those advanced facial morphs allow a high degree of fine tuning, both for additional modeling detail in specific areas such as the eyes and mouth corners – as well as to adjust vertex interpolation across the mesh for improved animation.

173 Mesh Pose Correction Morphs

The importance of making models which are well matched to the CC3 default T Pose is described in tutorial: Pose and Gaze Correction, where an external application is used to make fundamental pose changes. These new morphs provide additional functionality to adjust head, arm and hand angles - to assist with mesh pose correction directly within CC3.

After installation, you can find all the morph slider data under your ..\Reallusion\Template\Character Creator 3 Template\AvatarControl\Adjustment and Balance Morphs". Please refer to the included readme.txt for further instruction.

Advanced Facial Morphs

CC_Base_Eye Adjust

  • eyeball back l.ccSlider
  • eyeball back r.ccSlider
  • eyeball down l.ccSlider
  • eyeball down r.ccSlider
  • eyeball enlarge l.ccSlider
  • eyeball enlarge r.ccSlider
  • eyeball forward l.ccSlider
  • eyeball forward r.ccSlider
  • eyeball iris enlarge.ccSlider
  • eyeball iris flatten.ccSlider
  • eyeball iris shrink.ccSlider
  • eyeball move in l.ccSlider
  • eyeball move in r.ccSlider
  • eyeball move out l.ccSlider
  • eyeball move out r.ccSlider
  • eyeball pupil scale.ccSlider
  • eyeball shrink l.ccSlider
  • eyeball shrink r.ccSlider
  • eyeball up l.ccSlider
  • eyeball up r.ccSlider

CC_Base_Teeth Adjust

  • teeth back forward.ccSlider
  • teeth down up.ccSlider
  • teeth lower back forward.ccSlider
  • teeth lower down up.ccSlider
  • teeth lower left right.ccSlider
  • teeth lower rotate back.ccSlider
  • teeth lower rotate forward.ccSlider
  • teeth lower rotate left.ccSlider
  • teeth lower rotate right.ccSlider
  • teeth lower scale depth.ccSlider
  • teeth lower scale height.ccSlider
  • teeth lower scale width.ccSlider
  • teeth lower scale.ccSlider
  • teeth right left.ccSlider
  • teeth rotate back.ccSlider
  • teeth rotate forward.ccSlider
  • teeth rotate left.ccSlider
  • teeth rotate right.ccSlider
  • teeth scale depth.ccSlider
  • teeth scale height.ccSlider
  • teeth scale width.ccSlider
  • teeth scale.ccSlider
  • teeth upper back forward.ccSlider
  • teeth upper down up.ccSlider
  • teeth upper left right.ccSlider
  • teeth upper rotate back.ccSlider
  • teeth upper rotate forward.ccSlider
  • teeth upper rotate left.ccSlider
  • teeth upper rotate right.ccSlider
  • teeth upper scale depth.ccSlider
  • teeth upper scale height.ccSlider
  • teeth upper scale width.ccSlider
  • teeth upper scale.ccSlider

Eye Adjust

  • eye inner corner depth l.ccSlider
  • eye inner corner depth r.ccSlider
  • eye inner corner depth.ccSlider
  • eye lower depth.ccSlider
  • eye outer corner depth l.ccSlider
  • eye outer corner depth r.ccSlider
  • eye outer corner depth.ccSlider
  • eye_outer_width_left.ccSlider
  • eye_outer_width_right.ccSlider
  • eyelid inner depth l.ccSlider
  • eyelid inner depth r.ccSlider
  • eyelid inner depth.ccSlider
  • eyelid inner lower depth l.ccSlider
  • eyelid inner lower depth r.ccSlider
  • eyelid inner lower depth.ccSlider
  • eyelid inner lower height l.ccSlider
  • eyelid inner lower height r.ccSlider
  • eyelid inner lower height.ccSlider
  • eyelid inner upper depth l.ccSlider
  • eyelid inner upper depth r.ccSlider
  • eyelid inner upper depth.ccSlider
  • eyelid inner upper height l.ccSlider
  • eyelid inner upper height r.ccSlider
  • eyelid inner upper height.ccSlider
  • eyelid rim lower depth r.ccSlider
  • eyelid rim lower depth l.ccSlider
  • eyelid rim lower depth.ccSlider
  • eyelid rim upper depth l.ccSlider
  • eyelid rim upper depth r.ccSlider
  • eyelid rim upper depth.ccSlider
  • eyes_inner_corner_forward_back.ccSlider
  • eyes_outer_inner_width.ccSlider
  • eyes_outer_width.ccSlider
  • tear duct back.ccSlider
  • tear duct forward.ccSlider
  • tear duct inward curve.ccSlider
  • tear duct scale.ccSlider

Eye Balance

  • eyelid balance inner corner l.ccSlider
  • eyelid balance inner corner r.ccSlider
  • eyelid balance l.ccSlider
  • eyelid balance lower l.ccSlider
  • eyelid balance lower r.ccSlider
  • eyelid balance outer corner l.ccSlider
  • eyelid balance outer corner r.ccSlider
  • eyelid balance r.ccSlider
  • eyelid balance upper l.ccSlider
  • eyelid balance upper r.ccSlider
  • eyelid balance.ccSlider
  • eyelid relax inner corner l.ccSlider
  • eyelid relax inner corner r.ccSlider
  • eyelid relax l.ccSlider
  • eyelid relax lower l.ccSlider
  • eyelid relax lower r.ccSlider
  • eyelid relax outer corner l.ccSlider
  • eyelid relax outer corner r.ccSlider
  • eyelid relax r.ccSlider
  • eyelid relax upper l.ccSlider
  • eyelid relax upper r.ccSlider
  • eyelid relax.ccSlider

Brow Balance

  • brows lower line four relax.ccSlider
  • brows lower line relax.ccSlider
  • brows lower line three relax.ccSlider
  • brows lower line two relax.ccSlider
  • brows upper line relax.ccSlider
  • brows upper line one relax.ccSlider
  • brows upper line two relax.ccSlider

Mouth Adjust

  • inner lip bottom up down.ccSlider
  • inner lip top up down.ccSlider
  • inner lips open close.ccSlider
  • mouth corner tweak one l.ccSlider
  • mouth corner tweak one r.ccSlider
  • mouth corner tweak two l.ccSlider
  • mouth corner tweak two r.ccSlider
  • mouth inner corner depth l.ccSlider
  • mouth inner corner depth r.ccSlider
  • mouth inner corners depth.ccSlider
  • mouth inner corners height.ccSlider
  • mouth inner corners width.ccSlider
  • mouth inner depth.ccSlider
  • mouth inner lower height.ccSlider
  • mouth inner upper height.ccSlider
  • mouth lower one out in.ccSlider
  • mouth lower three out in.ccSlider
  • mouth lower two out in.ccSlider
  • mouth outer corners back forward.ccSlider

Mouth Balance

  • mouth chin down relax.ccSlider
  • mouth corner relax l.ccSlider
  • mouth corner relax r.ccSlider
  • mouth corners relax.ccSlider
  • mouth inner corner relax l.ccSlider
  • mouth inner corner relax r.ccSlider
  • mouth inner corners relax.ccSlider
  • mouth inner loop four lower relax.ccSlider
  • mouth inner loop one lower relax.ccSlider
  • mouth inner loop one relax l.ccSlider
  • mouth inner loop one relax r.ccSlider
  • mouth inner loop one relax.ccSlider
  • mouth inner loop one upper relax.ccSlider
  • mouth inner loop three lower relax.ccSlider
  • mouth inner loop three relax l.ccSlider
  • mouth inner loop three relax r.ccSlider
  • mouth inner loop three relax.ccSlider
  • mouth inner loop three upper relax.ccSlider
  • mouth inner loop two lower relax.ccSlider
  • mouth inner loop two relax l.ccSlider
  • mouth inner loop two relax r.ccSlider
  • mouth inner loop two relax.ccSlider
  • mouth inner loop two upper relax.ccSlider
  • mouth jowls relax.ccSlider
  • mouth loop relax l.ccSlider
  • mouth loop relax r.ccSlider
  • mouth loop relax.ccSlider
  • mouth lower mid relax l.ccSlider
  • mouth lower mid relax r.ccSlider
  • mouth lower mid relax.ccSlider
  • mouth mid relax.ccSlider
  • mouth outer loop one relax l.ccSlider
  • mouth outer loop one relax r.ccSlider
  • mouth outer loop one relax.ccSlider
  • mouth outer loop two relax l.ccSlider
  • mouth outer loop two relax r.ccSlider
  • mouth outer loop two relax.ccSlider
  • mouth side line four relax.ccSlider
  • mouth side line one relax.ccSlider
  • mouth side line two relax.ccSlider
  • mouth upper line one relax.ccSlider
  • mouth upper line three relax.ccSlider
  • mouth upper line two relax.ccSlider
  • mouth upper mid relax l.ccSlider
  • mouth upper mid relax r.ccSlider
  • mouth upper mid relax.ccSlider

Tongue Adjust

  • tongue move out in.ccSlider
  • tongue move up down.ccSlider
  • tongue scale depth.ccSlider
  • tongue scale height.ccSlider
  • tongue scale width.ccSlider
  • tongue scale.ccSlider

Nose Adjust

  • nose philtrum width.ccSlider
  • nose septum only width.ccSlider
  • nostril inner height.ccSlider

Nose Balance

  • nose bridge line five relax.ccSlider
  • nose bridge line four relax.ccSlider
  • nose bridge line one relax.ccSlider
  • nose bridge line six relax.ccSlider
  • nose bridge line three relax.ccSlider
  • nose bridge line two relax.ccSlider
  • nose side line four relax.ccSlider
  • nose side line one relax.ccSlider
  • nose side line three relax.ccSlider
  • nose side line two relax.ccSlider
  • nostril crease relax.ccSlider

Cheek Balance

  • cheek line five relax.ccSlider
  • cheek line four relax.ccSlider
  • cheek line one relax.ccSlider
  • cheek line three relax.ccSlider
  • cheek line two relax.ccSlider
  • cheeks relax.ccSlider

Ear Adjust

  • ear angle top.ccSlider
  • ear length.ccSlider
  • ear reshape.ccSlider

Skull Adjust

  • skull back in out.ccSlider
  • skull back sides angle.ccSlider
  • skull back up down.ccSlider
  • skull back width.ccSlider
  • skull base in out.ccSlider
  • skull base width.ccSlider
  • skull ear back depth.ccSlider
  • skull front sides angle.ccSlider
  • skull over ears width.ccSlider
  • skull peak height.ccSlider
  • skull sides up down.ccSlider

Full Head Adjust

  • face depth with bones.ccSlider
  • face depth without bones.ccSlider
  • face depth.ccSlider
  • head_thinner.ccSlider

Pose Adjust (Mesh Pose Correction Morphs)

  • arm l move down up.ccSlider
  • arm l rotate back forward.ccSlider
  • arm l rotate up down.ccSlider
  • arm l twist down up.ccSlider
  • arm r move down up.ccSlider
  • arm r rotate back forward.ccSlider
  • arm r rotate up down.ccSlider
  • arm r twist down up.ccSlider
  • arms move down up.ccSlider
  • arms rotate back forward.ccSlider
  • arms rotate up down.ccSlider
  • arms twist down up.ccSlider
  • elbow l bend back forward.ccSlider
  • elbow l bend down up.ccSlider
  • elbow l twist down up.ccSlider
  • elbow r bend back forward.ccSlider
  • elbow r bend down up.ccSlider
  • elbow r twist down up.ccSlider
  • elbows bend back forward.ccSlider
  • elbows bend down up.ccSlider
  • elbows twist down up.ccSlider
  • hand l extend relax.ccSlider
  • hand r extend relax.ccSlider
  • hands extend relax.ccSlider
  • head move back forward.ccSlider
  • head move left right.ccSlider
  • head rotate left right.ccSlider
  • head rotate up down.ccSlider
  • head tilt left right.ccSlider
  • wrist l bend back forward.ccSlider
  • wrist l bend down up.ccSlider
  • wrist l twist down up.ccSlider
  • wrist r bend back forward.ccSlider
  • wrist r bend down up.ccSlider
  • wrist r twist down up.ccSlider
  • wrists bend back forward.ccSlider
  • wrists bend down up.ccSlider
  • wrists twist down up.ccSlider

Finger Adjust

  • index1_in_out.ccSlider
  • index1_twist.ccSlider
  • index1_up_down.ccSlider
  • index2_in_out.ccSlider
  • index2_twist.ccSlider
  • index2_up_down.ccSlider
  • index3_in_out.ccSlider
  • index3_up_down.ccSlider
  • index3_twist.ccSlider
  • l_index1_in_out.ccSlider
  • l_index1_twist.ccSlider
  • l_index1_up_down.ccSlider
  • l_index2_in_out.ccSlider
  • l_index2_twist.ccSlider
  • l_index2_up_down.ccSlider
  • l_index3_in_out.ccSlider
  • l_index3_twist.ccSlider
  • l_index3_up_down.ccSlider
  • l_mid1_in_out.ccSlider
  • l_mid1_twist.ccSlider
  • l_mid1_up_down.ccSlider
  • l_mid2_in_out.ccSlider
  • l_mid2_twist.ccSlider
  • l_mid2_up_down.ccSlider
  • l_mid3_in_out.ccSlider
  • l_mid3_twist.ccSlider
  • l_mid3_up_down.ccSlider
  • l_pinky1_in_out.ccSlider
  • l_pinky1_twist.ccSlider
  • l_pinky1_up_down.ccSlider
  • l_pinky2_in_out.ccSlider
  • l_pinky2_twist.ccSlider
  • l_pinky2_up_down.ccSlider
  • l_pinky3_in_out.ccSlider
  • l_pinky3_twist.ccSlider
  • l_pinky3_up_down.ccSlider
  • l_ring1_in_out.ccSlider
  • l_ring1_twist.ccSlider
  • l_ring1_up_down.ccSlider
  • l_ring2_in_out.ccSlider
  • l_ring2_twist.ccSlider
  • l_ring2_up_down.ccSlider
  • l_ring3_in_out.ccSlider
  • l_ring3_twist.ccSlider
  • l_ring3_up_down.ccSlider
  • l_thumb1_in_out.ccSlider
  • l_thumb1_twist.ccSlider
  • l_thumb1_up_down.ccSlider
  • l_thumb2_in_out.ccSlider
  • l_thumb2_twist.ccSlider
  • l_thumb2_up_down.ccSlider
  • l_thumb3_in_out.ccSlider
  • l_thumb3_twist.ccSlider
  • l_thumb3_up_down.ccSlider
  • mid1_in_out.ccSlider
  • mid1_twist.ccSlider
  • mid1_up_down.ccSlider
  • mid2_in_out.ccSlider
  • mid2_twist.ccSlider
  • mid2_up_down.ccSlider
  • mid3_in_out.ccSlider
  • mid3_twist.ccSlider
  • mid3_up_down.ccSlider
  • pinky1_in_out.ccSlider
  • pinky1_twist.ccSlider
  • pinky1_up_down.ccSlider
  • pinky2_in_out.ccSlider
  • pinky2_twist.ccSlider
  • pinky2_up_down.ccSlider
  • pinky3_in_out.ccSlider
  • pinky3_twist.ccSlider
  • pinky3_up_down.ccSlider
  • r_index1_in_out.ccSlider
  • r_index1_twist.ccSlider
  • r_index1_up_down.ccSlider
  • r_index2_in_out.ccSlider
  • r_index2_twist.ccSlider
  • r_index2_up_down.ccSlider
  • r_index3_in_out.ccSlider
  • r_index3_twist.ccSlider
  • r_index3_up_down.ccSlider
  • r_mid1_in_out.ccSlider
  • r_mid1_twist.ccSlider
  • r_mid1_up_down.ccSlider
  • r_mid2_in_out.ccSlider
  • r_mid2_twist.ccSlider
  • r_mid2_up_down.ccSlider
  • r_mid3_in_out.ccSlider
  • r_mid3_twist.ccSlider
  • r_mid3_up_down.ccSlider
  • r_pinky1_in_out.ccSlider
  • r_pinky1_twist.ccSlider
  • r_pinky1_up_down.ccSlider
  • r_pinky2_in_out.ccSlider
  • r_pinky2_twist.ccSlider
  • r_pinky2_up_down.ccSlider
  • r_pinky3_in_out.ccSlider
  • r_pinky3_twist.ccSlider
  • r_pinky3_up_down.ccSlider
  • r_ring1_in_out.ccSlider
  • r_ring1_twist.ccSlider
  • r_ring1_up_down.ccSlider
  • r_ring2_in_out.ccSlider
  • r_ring2_twist.ccSlider
  • r_ring2_up_down.ccSlider
  • r_ring3_in_out.ccSlider
  • r_ring3_twist.ccSlider
  • r_ring3_up_down.ccSlider
  • r_thumb1_in_out.ccSlider
  • r_thumb1_twist.ccSlider
  • r_thumb1_up_down.ccSlider
  • r_thumb2_in_out.ccSlider
  • r_thumb2_twist.ccSlider
  • r_thumb2_up_down.ccSlider
  • r_thumb3_in_out.ccSlider
  • r_thumb3_twist.ccSlider
  • r_thumb3_up_down.ccSlider
  • ring1_in_out.ccSlider
  • ring1_twist.ccSlider
  • ring1_up_down.ccSlider
  • ring2_in_out.ccSlider
  • ring2_twist.ccSlider
  • ring2_up_down.ccSlider
  • ring3_in_out.ccSlider
  • ring3_twist.ccSlider
  • ring3_up_down.ccSlider
  • thumb1_in_out.ccSlider
  • thumb1_twist.ccSlider
  • thumb1_up_down.ccSlider
  • thumb2_in_out.ccSlider
  • thumb2_twist.ccSlider
  • thumb2_up_down.ccSlider
  • thumb3_in_out.ccSlider
  • thumb3_twist.ccSlider
  • thumb3_up_down.ccSlider

What's Included

HD Videos & Resources (.zip) - 6.91 GB

  • Tutorial Videos (.mp4)
    • 3D Scan Retopology Pipeline X 13
    • Facial & Body Optimization X 6
  • Quick Guide Video for Bonus Morphs x 2 (.mp4)
  • Map Fixer (.psd)
    • Diffuse x 1
    • Normal x 1

Optimization Morphs (.rld) - 126 MB

  • Facial Adjustment and Balance Morph x 228
  • Mesh Pose Correction Morph x 173
  • CC RTL Lightroom x 1 (for improved surface feedback when optimizing scan conversions)

GET LEARNING FROM THE FULL BUNDLE

3d scan content pack

Partner Recruitment

CONTACT US

With Reallusion, you can turn all your 3D scanned human statues into fully-rigged 3D characters for realtime face and body animation. Just complete this form so our team can contact you directly!

With Reallusion, you can turn all your 3D scanned human statues into fully-rigged 3D characters for realtime face and body animation. Just complete this form so our team can contact you directly!

  • Please enter your name.
  • Please enter your company or institution.
  • Please enter your company.
*Mocap Gear you have (hardware)
  • You need to choose a hardware.
  • If you choose "others", please enter a name.
*Mocap Profile Interested (software)
  • You need to choose a software.
  • If you choose "others", please enter a name.
  • Please enter a message.